Cracks and joint issues in PVC drain pipes can often go unnoticed until they lead to significant problems. Addressing these issues with effective repairs can save you both time and the cost of complete pipe replacement. This article explores practical solutions to tackle PVC drain pipe repairs, focusing on extending the lifespan of your plumbing system without the need for replacement.
- Learn how to identify typical signs of damage in PVC drain pipes to address problems early.
- Discover the essential materials and tools required for effective DIY repairs that ensure durability and reliability.
- Follow a detailed guide offering step-by-step instructions to repair cracks and joints without replacing the entire pipe.
By mastering these techniques, you can maintain your plumbing system’s performance and prevent costly repairs. Dive into our resourceful guide to keep your PVC drain pipes in top working condition.
Identifying Problems in PVC Drain Pipe Repair: Fix Cracks and Joints Without Replacement
Understanding the specific issues affecting your PVC drain system is crucial for effective repair. Commonly, homeowners encounter problems such as hairline cracks or leaking joints due to temperature fluctuations, improper installation, or physical impact.
Warning signs often include slow drainage, persistent leaks, and visible water damage around the pipe area. Detecting a crack in PVC pipe usually involves inspecting the pipe for small splits or surface abrasions. These can often be highlighted by discoloration or mineral deposits resulting from continuous leaks.
Joint issues might present as gaps or misalignments where the pipes connect, commonly accompanied by dripping water or moisture accumulation. Being adept at identifying these signs early on is pivotal in executing a successful PVC pipe repair.
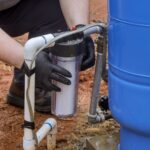
Materials and Tools Needed for Effective PVC Drain Pipe Repair
For a durable fix, it’s important to gather the right materials and tools. Quality and longevity should be at the forefront of your selection process, especially when dealing with PVC drain pipe repair. Below are essential items to have on hand:
- PVC repair epoxy or pipe sealant: Effective for sealing small cracks and preventing further leakage.
- Pipe cutter or hacksaw: These are necessary to remove damaged pipe sections if needed.
- Sandpaper: Use this to smooth the pipe surface before applying any repair material.
- Cloth or towel: To clean and dry the pipe area ensuring a solid bond for the repair materials.
Additional tools may include a heat gun for temporary sealing or expansion adjustments and a strong flashlight for inspecting less accessible areas. Always prioritize using high-quality products to ensure the repair of PVC pipes withstands regular use and environmental stress.
Step-by-Step Guide to PVC Drain Pipe Repair: Fix Cracks and Joints Without Replacement
Repairing your PVC drain pipes can prevent costly replacements and ensure a smooth plumbing operation. Follow this detailed step-by-step guide to address cracks and joint issues effectively.
Step 1: Gather Necessary Materials and Tools
Before you begin, ensure you have all the necessary materials and tools ready. This includes PVC primer and cement, sandpaper, a utility knife, and protective gloves. Having these on hand is essential for a successful repair.
Step 2: Turn Off the Water Supply
Safety first. Always start by shutting off the water supply to the affected area. This prevents any unexpected leaks or water damage during the repair process.
Step 3: Assess the Damage
Carefully examine the PVC drain pipe to identify the cracks and joint issues. Note the severity and location of the damage. This will inform the specific repair methods you’ll need to apply.
Step 4: Prepare the Surface
Use sandpaper to clean and roughen up the surface around the damaged area. This preparation increases the adhesion of the repair materials, ensuring a more durable fix.
Step 5: Apply PVC Primer
PVC primer is crucial for softening the pipe material, enabling a better bond. Apply a generous amount to both the pipe and the fitting areas that need repair.
Step 6: Apply PVC Cement
Immediately after priming, apply PVC cement. Cover the entire surface liberally to create a strong, watertight seal. Be quick, as the cement can dry rapidly.
Step 7: Allow the Repair to Cure
After application, allow the repair to cure for the recommended time according to the cement manufacturer’s instructions. Curing ensures the integrity and longevity of the repair.
Step 8: Test the Repair
Once cured, turn the water supply back on and check for leaks. Monitor the repaired area closely to ensure the cracks and joint issues are fully resolved.
By following these steps, you can restore the functionality of your PVC drain pipe and avoid the expense of full replacement. For more expert repair guides, explore our extensive collection of resources.
Frequently Asked Questions about PVC Drain Pipe Repair
What causes cracks and joint issues in PVC drain pipes?
Cracks and joint issues are often caused by external pressure, aging, or incorrect installation.
Can all cracks in PVC pipes be fixed without replacement?
Small and medium cracks can be repaired, but severe damage may require replacement.
What materials are needed to repair PVC pipes?
You will need epoxy resin, PVC primer, PVC cement, and reinforcing fabric, among other tools.
How long does the repair process typically take?
Repairing a PVC drain pipe generally takes a few hours, including drying time.
Is it necessary to turn off the water supply before repairs?
Yes, turning off the water supply prevents further damage and makes the repair process easier.
How can I ensure a long-lasting repair?
Use quality materials and follow the repair guide carefully for a durable fix.